Showing posts with label Sun. Show all posts

Sunday, October 9, 2016

The sun still rises

One of the most common of natures phenomena is the sunrise, watched by millions of people throughout history, always pretty and never boring. The Bible mentions sunrise many times and I included several appropriate verses throughout the article.

Ecclesiastes 1:5  The sun still rises, and it still goes down, going wearily back to where it must start all over again.

During this time of year there is a small gap in the buildings surrounding me, which enables a clear view of the sunrise in the east. I cannot see the exact sunrise, as the Samaria mountains block the horizon, but I do manage to see a few minutes after it. The series of photos show how each day the sun moves southward (the movement is actually the Earth movement in its orbit).

Sunday 25-Sep-2016. There were plenty of clouds so seeing the sunrise location was impossible, however, the photos are still nice.

Sunrise 25/9/2016
Sunrise 25/9/2016
Sunrise 25/9/2016
Sunrise 25/9/2016
Genesis 32:31 (ASV) And the sun rose upon him as he passed over Penuel

Monday, September 26th. The hill's name is "Jabel Taruja" where an ancient tomb is located. The hill is about 36km from my location.
Sunrise 26/9/2016
Sunrise 26/9/2016
The palm tree, however, is just 400m from the camera
Sunrise 26/9/2016
Sunrise 26/9/2016
Jonah 4:8 (CEB) Then as the sun rose God provided a dry east wind

Birds are very active in the morning, so at some point they are likely to fly in front of the sun, making a nice photo.

Sunrise 26/9/2016
Sunrise 26/9/2016
Sunrise and a crow
Sunrise and a crow

Deuteronomy 33:2 (GNT) The Lord came from Mount Sinai; he rose like the sun over Edom

Tuesday 27/9/2016 - Notice the change in the sun's location.

Sunrise 27/9/2016
Sunrise 27/9/2016
Here is a video of the sunrise at six times speed:


and here are the last photos as the clouds "swallows" the sun.

Sunrise 27/9/2016
 Sunrise 27/9/2016
Judges 9:33 (KJV) And it shall be, that in the morning, as soon as the sun is up, thou shalt rise early,
2 Kings 3:22 (CJB) They rose early in the morning when the sun was shining on the water.

On Wednesday the sunrise is just to the left of the palm tree
Sunrise 28/9/2016
Sunrise 28/9/2016
2 Samuel 23:4 (NKJV) And he shall be like the light of the morning when the sun rises, A morning without clouds

But on Thursday 29/9 it is on the tree's right
Sunrise 29/9/2016
Sunrise 29/9/2016
And more birds

Sunrise 29/9/2016
Sunrise 29/9/2016
Malachi 4:2 (CJB) But to you who fear my name, the sun of righteousness will rise with healing in its wings

Friday 30/9/2016 and the sun continues moving further south.

Sunrise 30/9/2016
Sunrise 30/9/2016


זריחה כ"ז אלול תשע"ו 30/9/2016
Sunrise 30/9/2016
Psalm 104:22 (NKJV) When the sun rises, they gather together And lie down in their dens.

Sunday 2-Oct-2016 marked the last day of the Hebrew year 5776, and what a beautiful sunrise on this day

Sunrise 2/10/2016
Sunrise 2/10/2016
Malachi 1:11 (NKJV) For from the rising of the sun, even to its going down, My name shall be great among the Gentiles;

To summarize the article, here is a wider photo from 29/9/2016 with added arrows to mark the sunrise locations some days before and after. The changes are considerable.

Sunrise 29/9 with location on nearbydates marked
Sunrise 29/9 with location on nearby dates marked


The apparent movement of the sun in the sky is a combination of two movements: the Earth revolving around its axis is the daily motion of the sun in the sky from sunrise to sunset, and the yearly movement of Earth in its orbit around the sun causing small changes in the sun's location during the seasons. That small change is shown in the series above as every day the sunrise is in a slightly different place.

Sunday, April 10, 2016

Hazy Sunset

Astronomers don't like haze. It is bad. But even haze has it benefits and sometimes you can clearly see the sun through the haze without the need of filters which are otherwise a must. During sunset and the right amount of haze you might even be able to see sunspots with the naked eye as was the case today with sunspot AR2529. Also the swallows in the sky flew beyond it to create interesting photos And a nice video to start with

But let's o back to the beginning. Here is a general photo of the sun. The haze makes the skies brown and yellow, quite eek, and the sun itself much dimmer than it should be.
The sun in the haze
The sun in the haze
More zoom toward the sun but the exposure is wrong. However the small flock of birds make this photo special and the sunspot can be seen,.

The sun and birds
The sun and birds
A proper exposure will show some details of the sunspot and the birds are over the sun.
Sunspot and birds
Sunspot and birds

The dark region of sunspot AR2529 is 20,000KM in diameter
Sunspot AR2529
Sunspot AR2529

The power cords also gives an interesting photo
The sun and power-cords


Few minutes later the haze is so bad that the sun fades long before actual sunset.
Hazy sun
Hazy sun


And the new moon for dessert.

The new moon 10-Apr-2016


Wednesday, February 25, 2015

How to view a solar eclipse safely

Solar eclipse is a wonder - partial and definitely a total. Many people wants to observe this marvelous celestial event and some will go great distance to a place of totality. Here are some tips and rule which will enable you to view the event safely. Remember that direct viewing of the sun with the eyes is dangerous and doing it with an optical aid such as binoculars or a telescope may cause permanent damage and blindness. Do not use improvisations such as old floppy disks, old films etc.
This warning is true even if the eclipse is 98%. Never look at the sun directly. If you are so fur tune to have a full solar eclipse you can look at the sun halo during the short period of totatily.
The instructions are also suitable for a Solar eclipse observations. 

After this warning here are some options to view a solar Eclipse.
Solar Eclipse Glasses
  1. Get special solar eclipse glasses. These are special glasses, with special filters which block almost 99.99% of the sun light. Such glasses are not expensive, and will be very useful for future solar eclipses (there will be a full solar eclipse in 2017 in the USA). However, such glasses are to be used with the eyes only, and not through a telescope or binoculars!
  2. If you have a telescope you might want to consider to purchase a Solar Telescope Filter for it. There are generic filters which are suitable for many telescopes and there are vendor specifics filters for the vendor brands. You can buy at Amazon or at your local dealer. These filters are attached to the telescope, in front of it and block the light BEFORE it enters the telescope. Such filters MUST NOT be used instead of an eyepiece. The light from the sun must be blocked before it is concentrated by the telescope (the filter is not strong enough to block the light after the telescope concentrates it). During the observations make sure that the filter is strongly attached and that no one removes it by mistake (especially when you are doing an observation with a group of people).
  3. If you are really into solar viewing, you should consider purchasing a dedicated solar telescope. Such telescopes as the Coronado PST are dedicated and safe for solar viewing and are useful to observe other interesting solar phenomena such as the sun prominence.
       
  4. If you have a telescope and you want to project the image to a large audience you can use the projection method. Basically you project the image of the Sun to a dark surface (make it in the shade) and focus. Sunspots are very visible this way. This method is appropriate for small refractors and Newtonian telescopes, but not for SCT telescopes. If you are not sure how to do it or if it is suitable for your telescope do not do it! Personally, I do not like this method very much since I think that if you already have a telescope, it is a very little investment to buy the filter. Take note that the intensity of the sun light may harm the telescope as it creates heat which can harm the plastic and the optics so do it at your own risk. Also make sure that no-one ever tries to look through the telescope at the sun. Full instructions are here
  5. You actually don't have to own a telescope to project the sun. You can build a great homemade pinhole projector from simple boxes. You will get a small image of the sun and you will be able to see a dark spot on it. Watch the below video to see how (It is recommended to watch in on full screen)
  6. If you do not have the solar glasses nor a telescope, join your local astronomy club. Any eclipse is a major event and professional observatory and local amateur groups will provide the means for the public to view the eclipse properly and safely.
  7. Join a live web cast of the event. Many observatories from around the globe will host live cover of the eclipse. You will be able to view it safely from your home. However, I think that this is the less preferred option to view an eclipse (just one step away from not viewing it at all) as there is no replacement for viewing with your own eye.

Projecting the sun through a telescope - a bit risky but possible

Saturday, March 1, 2014

Sunspots

Sunspots are fascinating if you know how to watch and study them. Fortunately, you can observe and photograph sunspots safely with simple equipment and affordable accessories.
Here is a nice video

What are sunspots?
Sunspots are cooler areas on the sun surface. They are not really cool, just 500-600 degrees cooler than their environment. Sunspots emit less radiation and this is the reason why they look black on the surface of the sun. The sunspots by themselves are still many times brighter than the full moon. The reason why and when sunspots are formed on the sun is not clear yet but it is related to high electromagnetic energy activity. Sunspot regions are very active and can send strong CME (Coronal Mass Ejection) to space. If such CME is in the direction of earth, there might be noticeable events such as the polar auroras and interferences to the electricity network.

Every observation of the sun requires special  protecting equipment. Direct watching of the sun is very dangerous and can lead to blindness. Do not use old films, black glasses and their like. Only dedicated protecting filters are allowed. The writer takes no responsibility for any viewing of the sun.


History of sunspot observations
The first person to observe sunspots was Galileo Galilee. Although it is possible to see large sunspots with the naked eye during sunsets, we have no documentation of anyone in the ancient times noticing them. Galileo looked through his telescope (and without giving proper notice to the safety guidelines, thus becoming blind at the end of his life) and saw the spots. The previously perfect sun became imperfect which was another low to the old Greek opinion that all celestial orbs are perfect. Galileo noticed that each day the spots look a bit different and also that they are moving on the sun. In a long series of drawings from 1613 he proved and demonstrated that the sun revolves around its axis. Here is an example of Galileo's drawings, you can see many more drawing in the Galileo project site.  

Galileo's drawing of sunspots 1613


Observing sunspots  with solar eclipse glasses
The most basic equipment are solar eclipse glasses. These glasses have a little solar filter film and it is safe to watch the sun with them. However most sunspots are too small and only big spots will be seen. Seeing the spots requires an optical device such as telescope, binoculars or long zoom camera.
Please notice that any solar filter must be in front of the first optical element. It is extremely dangerous to use solar eclipse glasses and then look through binoculars. The filters are not adequate for such use. The binoculars intensify the amount of the radiation and the filter will burn.

Creating a homemade solar filter
To view the sunspots through an optical device, a solar filter is required. A glass filter can be quite expensive, but there is a way to create a filter very easily. You need to buy a proper solar filter sheet (A4 size or whatever suits your need). You can make many filters from a single sheet for your camera, binoculars and so on. Looking through the filter you will see nothing except for very hot objects such as a tungsten light bulb.
Today there a DSLR-alike camera with 24x 30x or even 50x zoom lens which are very good for simple astro-photography. You can cut a square piece of kappa foam, make a circular hole in the diameter of your lens and stick a filter all over it. This will give you a proper solar filter. Make sure that the filter is firmly attached to the camera or binoculars and can't fall from it before use.
You will also need a tripod. Small cameras are not heavy and even a simple tripod will be good enough for most purposes.

Tungsten wire through solar filter
I am using a Canon PowerShot SX50 HS for sunspots photography. It is a small and affordable DSLR like camera with 50x zoom (1200mm equivalent). The camera is not very expensive and this is how it looks with the solar filter attached.

The camera with the dedicated sun filter

Some more safety rules
When observing the sun with such filter observe the following rules.
  • Always make sure that the filter is attached firmly. 
  • Make sure that no one tries to touch or check the filter.
  • If you have to leave the area, do not keep the telescope aimed at the sun. Aim it the ground and cover the lens with the plastic cap. 
  • Check that the filter is not scratched or torn before each use.

How to photograph sunspots
Photographing the spots is simple:
  • Put the filter on the camera and aim to the sun. 
  • Use the maximum zoom that the camera has (20x and up) but do not use digital zoom.
  • Set the camera focus to manual at infinity
  • Set camera ISO to value between 100 and 400. 
  • Use the largest aperture possible to enable a shorter shutter speed. 
  • Use a tripod even at faster shutter speed. 
  • Set the light-meter to spot mode. Most of the frame is completely dark and average light metering will yield wrong results.
  • Experiment with the shutter release setting. Usually a little overexposure (+2/3) will improve the photo
  • Use a delay to eliminate "camera shakes" from pressing the camera button
The best hour for sunspots photography is around local noon. The sun is at its highest point in the sky and that can improve the quality of the photo. Due to the Earth rotating around its axis, the spots will change their place in the sun disc during the day. To see this just take photographs at the morning, noon and evening of the same day.
However the spots has a real movement on the sun disc, since the sun revolves around its axis once in 25-35 days. The sun is made of gas so its rotation speed is not the same in different latitudes. The slowest rotation is around the poles and the fastest around the equator. For this reason if you take a photo on the same hour for several consecutive days you will see the movement of the spots as the sun rotate. Try to compare your photos to professional photos such as in the Space-weather site.
Viewing and photographing sunspots is great fun for me. When there are large spots I usually take solar eclipse glasses and show other people what's happening on the sun. Many people, old and young are interested to see the sunspots.

Here are several photos from consecutive dates (almost). I tried to rotate the photos so they will be in the same alignment. The movement of the spots is clear. The sun is very dynamic. New spots are forming, old spots are decaying, and no day is the same. Even without dedicated solar scope, one can see the changing face of the sun.

Sunspots  14/02/2014
Sunspots 14/02/2014
The spots start to disappear behind the sun limb
Sunspots  16/02/2014
Sunspots  16/02/2014

Sunspots  17/02/2014
Sunspots  17/02/2014
 Most sunspots disappeared but other are coming out from the left
Sunspots  18/02/2014
Sunspots  18/02/2014

Sunspots  20/02/2014
Sunspots  20/02/2014


Monday, February 3, 2014

Astro photos are easy

Astro-photography doesn't require expensive equipment. These photos all taken in a single day using an OLD Sony alpha DSLR (The ISS pass) and a relatively new Canon HS50 which has a great zoom. The only really must equipment is a sturdy tripod which will enable you to stable the camera for long star exposures.

 The sunspots photo requires a solar filter, and it is dangerous not to use one. Here is a detailed article about how to photograph sunspots

This huge sunspot is AR1967, and I am following it for many days. On February 3 2014 it was almost in the middle of the sun

Sunspot AR1967
Sunspot AR1967
 The next photos are from the sunset and the sunspots are seen easily
Sunspot AR1967 during sunset
The perfect round is a swanning ball on a high voltage power line, but it remind me the great Venus transit from two years ago.
Sunspot AR1967 during sunset

Sunspot AR1967 during sunset

Sunspot AR1967 during sunset
The next photo is a great ISS pass in the well known constellation Canis Major (Great dog). The pass was very low and the light pollution is visible. however the entire group is visible and in the full photo I was able to detect the open cluster M41. Also I caught the extinction of the pass and you can clearly see the graduate extinction in the pass color from white to red.
ISS pass in Canis Major

Even f your camera doesn't have much zoom power to get good photos of the moon or the sun, you can still get nice photos of the constellations. You will need to experiment but even 1 second of exposure will show many stars. If you are in a rural area you can take longer exposures. Be aware that the longer the exposure time, the stars will create small trails as the Earth keep rotating around its axis. Also notice that it might be hard to see stars on the camera small LCD and you might need the help of a laptop to compose the photo. Also try to use manual focus and set it to infinity.
Here is Orion Constellation
Orion Constellation
Orion Constellation
And Orion constellation with the ISS. This is a 20sec shot and the light pollution is clearly visible.

The ISS in Orion
The ISS in Orion
And finally the moon
The moon
The moon
Conclusions: Even with simple equipment there is plenty to do! Good luck

Sunday, May 20, 2012

Making a pinhole projecter for viewing the sun

A pinhole projector can be used to watch the sun safely. Even if you do not have a solar telescope or a special solar eyeglasses you can still watch the Venus transit with this simple homemade pinhole projector. It can be used during eclipses and during the Venus transit. All you need is a box, as large as possible. For the Venus transit a bigger box is required or simply connect several boxes together.

All methods for viewing the Venus transit safely

Here are the steps to create the pinhole projector.

1) Cut a hole in the box
2) Cover it with foil
3) Make a tiny hole in the foil using a booby pin
4) put the box toward the sun
5) Never look directly at the sun!
6) A tiny projected sun will appear at the end of the box
7) The sun size is about 1/100 of the box length
8) You can even use a refrigerator box!

Here is how it looks

A box to project the sun image
The Box. Notice the foil on the right.

 The sun is projected in the box


 The sun is projected in the box
 The sun is projected in the box
And a short video which will explain how to use it...


All methods for viewing the Venus transit safely

Monday, April 16, 2012

Sundials in Israel


Sundials were a very important mean in the past to measure and show the time. Today, sundials are regarded more as architectural and design artifacts. Most sundials contain a gnomon which is usually a rod which casts a shadow, and a table which shows the time. There are various types of sundials, simple and complex, and they can be very accurate. This article will show some examples of the many sundials that can be found around Israel.


For a tourist, one of the best places to look for sundials is the Eretz Israel Museum in Tel-Aviv. The museum has a yard with replicas of ten sundials, old and new, from several places around Israel. Also, there is a planetarium in the museum which you should visit.
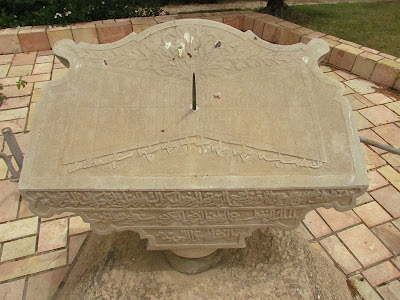

Sundial - Acre
Sundial - Acre

Sundial - Acre
Sundial - Acre
A replica of an ancient sundial

Ancient sundial - Israel
The Curved sundial does not have a gnomon, the entire shape of the sundial is the gnomon and it casts a shadow on the curved area. Such a sundial is good only for half of the day, so there is a need for more than one (which is on the other side of the stone).

An interesting Sundial on Bat Galim beach in Haifa. Notice the different of the width between the hours in the scale.
Sundial - Haifa
Sundial - Haifa
A replica of a Sundial from Jaffa.
Sundial - Jaffa
Sundial - Jaffa
 An interesting mosaic Sundial in Kfar Masaryk (Near Acre)
Sundial - Kfar Masaryk
On the western wall of the great synagogue in Petach-Tikva there are 3 sundials (All have replicas in Eretz Israel Museum). As they are on the west wall they can only be used in the second half of the day.
Sundial - Petach-Tikva synagogue

Sundial - Petach-Tikva synagogue

Sundial - Petach-Tikva synagogue
 העתקי השעונים נמצאים גם במוזיאון ארץ ישראל
Sundial - Petach-Tikva synagogue
Sundial - Petach-Tikva synagogue - Replica
 Also in Petach Tikva, in the Twelve Tribes park, a mosaic sundial.
Sundial - Petach Tikva - Twelve tribes park

Sundial - Petach Tikva - Twelve tribes park
Sundial - Petach Tikva - Twelve Tribes park

Sundial - Petach Tikva - Twelve tribes park
Sundial - Petach Tikva - Twelve Tribes park
 The largest sundial in Israel is in Rishon Lezion (Moshe Dayan street)
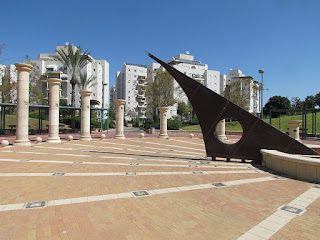
Sun dial - Rishon Lezion
Sundial - Rishon Lezion

Sundial - Rishon Lezion
 Going north again to Shomrat (Near Acre), an impressive sundial which has an "environmental" problem... The sundial is in the shade most of the day
Sundial in Shomrat
Sundial in Shomrat
 A rather new type of sundial is the one without a gnomon at all. You are the gnomon and you need to stand along the middle line next to the relevant date (see the dates in the third photo). These sundials have become more and more common across the world. The sundial is in Eretz Israel Museum Tel Aviv
Sundial - Eretz Israel Museum Tel Aviv

Sundial - Eretz Israel Museum Tel Aviv
Sundial - Eretz Israel Museum Tel Aviv - When you stand on it, your shadow shows the time

Sundial - Eretz Israel Museum Tel Aviv
Sundial - Eretz Israel Museum Tel Aviv - Notice the various lines for the dates in the year.
A most impressive park in Israel Ramat Hanadiv, is in memory of Baron Rothschild and is located near Zichron Yaakov.
Sundial in Ramat Hanadiv Zichron Yaakov
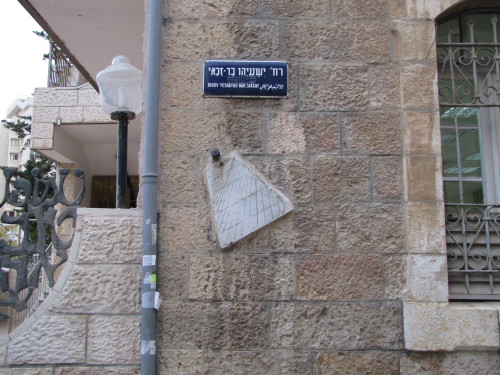
In Jerusalem there are several sundials. Here is one of them, the courtesy of Yoav Avnion

Sundial on a synagouge wall, Jerusalem:
Sundial on a synagouge wall, Jerusalem: Credit: Yoav Avnion
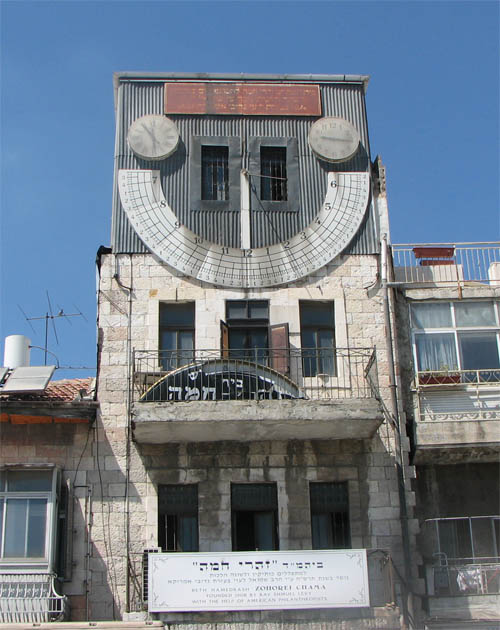
And another famous sundial in Jerusaelm in Yafo street near Machena Yehuda market on the wall of Zoharey Chama synagouge.
Sundial on a synagouge wall, Jerusalem
Sundial on a synagogue wall, Jerusalem: Credit: Yoav Avnion

שעון שמש עם פסוק משיר השירים
בחצר בית הספר האנגליקני ברחוב הנביאים 82 בירושלים
בית הספר האנגליקני תוכנן על ידי האדריכל ברספורד פייט והוקם בשנת 1897
תמונת CC שצילם והעלה לפליקר רון אלמוג ©
A sundial near the public library in Yerucham.
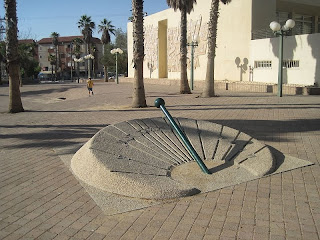
Sundial in Yerucham
Sundial in Yerucham - Sefi Shalev
A very interesting sundial in the IDF officers academy near Mitzpe Ramon. The reflection of the dial rings is the hour,
Sundial in the IDF academy
Sundial in the IDF academy - Tom Rosenfeld
My friend, Eden Orion - An astronomer and artist - Designed and built two sundials. The first sundial is in Kornit in the memory of Ben Sela. You can read about Kornit's sundial here (In hebrew) and even if you can't read Hebrew you will see many more photos there.

Sundial in Kornit.
Sundial in Kornit. Credit: Eden Orion
Another sundial designed by Eden (Only the astronomical feature) and  artistically designed and built by Yoav Shavit is in the national park of Ramat Gan. You can see many more photos and diagrams here (Also in Hebrew but Google translate does a fair job)
Sundial in Ramat-Gan
Sundial in Ramat-Gan. Credit: Eden Orion
Back to Jerusalem and to a new sundial by the old city walls created by the artist Maty Grunberg. The physical design was done by Ilan Manulis
Sundial in Teddy Park, Jerusalem
Sundial in Teddy Park, Jerusalem. Naomi Azar
Yigal Zemer, an artist, designed and built many sundials in Israel. Here are some of his sundials.
Sundial in Beit-Shean's guest house,
Sundial in Beit-Shean's guest house, Yigal Zemer

Sundial in Rechovot
Sundial in Rechovot, Yigal Zemer

Sundial in Mandelbaum pass, Jerusalem
Sundial in Mandelbaum pass, Jerusalem. Yigal Zemer

Sundial in Raanana
Sundial in Raanana. Yigal Zemer
A sundial can be part of a memorial monument like this sundial in Kedumim which is part of the memorial park to lt. Yishai Shechter.
Sundial in Kedumim
Sundial in Kedumim. Credit: Shlomi liss
On the roof of Mitzpe Ramon visitor's center there is a very accurate sundials. The center is in memory of Ilan Ramon, the first Israel Astronaut who died in the Columbia disaster (PS: Ilan choose his last name to be Ramon because he liked the area, not vice-verse)
Sundial in Mitzpe Ramon.
Sundial in Mitzpe Ramon. Anna Levin.

Sundial in Mitzpe Ramon.
Sundial in Mitzpe Ramon. Anna Levin.
Sundials also symbolized the value of labor, and working in the files from sunrise to sunset. This sundial in Deganya (The first Kibbutz) represent this theme, The writing says: "The day is short and the labor is vast"

Sundial in Deganya
Sundial in Deganya. Saar Nudel

Sundial in Deganya
Sundial in Deganya. Saar Nudel

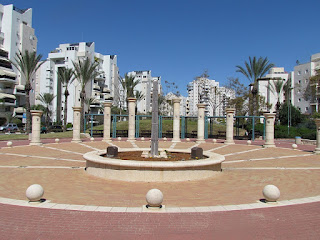
A unique time-field in Givatiim. Each pole shows the correct time when the sun is aligned with it.
Sundial at Givataaim
At the cave of the Patriacrhs in hebron there are old engravings which was used for sundial.
At the cave of the Patriacrhs in hebron
At the cave of the Patriarchs in Hebron. Photo: Amit Mendelson

A special sundials' garden in Ashqelon by the artist Yigal Tomarkin.
גן שעוני השמש באשקלון. פיסול יגאל תומרקין. צילום:דר אבישי טייכר. מתוך אתר פיקיוויקי
Sundials in Ashqelon: Photo: Avishay Taycher

A sundial with two gnomons (I am not sure which one is correct) is located in Tel-Azekah
Sundial in Tel-Azekah

The following sundial is located in the Lido's beach Ashdod. At first, it seems as a regular clock, and at the time I was there it was cloudy.
sundial in Ashdod
This sundial is at the summit of mount Tabor. Sadly as the clock is under shade it is not operational anymore, although you can see the subtle shade of the gnomon.
Sundial in Mt. Tabor - Photo by Muki zohar


There are more sundials in Israel, large and small, old and new. I will try and add more from time to time.

Also look at the following sites for sundials all over the world, I will be happy to add more just comment or send me a note.